

Hello, There are tons of LED Chaser circuits over the internet including analog ones, digital ICs, or Microcontroller based. Today in this blog I will discuss a simple LED chaser +blinker using the AVR ATmega16 microcontroller. So, let’s discuss it below starting with the introduction followed by the circuit, program, and a video.
AVR ATmega16
Atmega 16 is from AVR microcontroller Series.AVR is abbreviating Advanced Virtual RISC& RISC is Reduced Instruction Set. Now coming to Atmega16 in which, AT means ATMEL and 16 means, it’s having 16KBs of programmable flash memory. It’s an 8-bit, 40-pin microcontroller IC useful in embedded systems applications and is developed using CMOS technology.
It is a single chip having inbuilt CPU, register, EEPROM, RAM 1kb ADCs counters. It is having four ports PORT A, PORT B, PORTC, PORTD with each port having 8-pins from p0 to p7.
The Circuit

Here in this circuit, I have made PORTA of the micro-controller IC as all pins output pins that are connected to the LEDs positive and LEDs negative are connected to the ground.
XTAL1&2 are connected to the 14 MHz crystal oscillator for proper clocking (by the way it’s not necessary here will descript about that in another article). AVcc is for microcontroller’s own power input 5v. According to my code, all LEDs from PA0 to PA7 pins are sequentially glowing one after the other that you will see later in the video.
The code writing and Putting it to Proteus for simulation
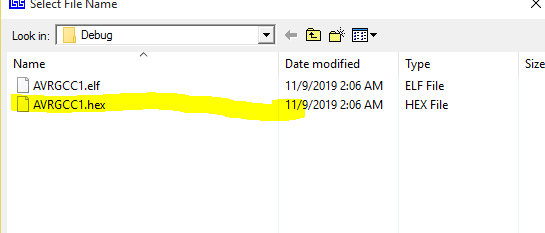
I used AVR studio, for writing and running code and for simulation ISIS proteus is the software used. For linking code to the circuit just double click on the micro-controller ic and select program files as shown in images.

After clicking, now select the file with .hex extension file you will find after you have written and saved your program(make a separate folder in which there are all program-related files are saved).
After selecting, your circuit is ready for simulation. I suggest, before making the physical circuit and flashing the controller IC, always first, simulate your project. Use an AVR ATmega 16/32 microcontroller development board for ease of configuration and flashing.

AVR LED Chaser Code
 include <avr/io.h>
 include <util/delay.h>
 int main()
 {
     DDRA=0XFF;
     while(1)
     {
for(int i=0;i<8;i++)
 {
 PORTA=(0b10000000>>i);
 _delay_ms(200);
}}return 0;
 }
Here is a simple program for this, I have set all pins of PORTA as output by using DDR register(Data Direction Register) by DDRA=0XFF; there is int main() for program starting, The while(1) is for an infinite loop, I have used for loop to increase he the count of “i” variable and put each pin of PORTA as high(1) each after the other sequentially. The _delay_ms(some value); is used for setting time after each port will go on and off. Return 0; is for returning values and used with int main().
I hope you people liked this project, If you liked it, please let me know in the comments. For any kind of questions or queries, you can comment below. And watch the video to see them working.
Video
Thanks for reading the article. Comment below and tell me if you liked it. For any queries or suggestions, you can comment below.
Great site. A lot of helpful information here. I am sending it to a few friends ans also sharing in delicious.
And obviously, thank you to your sweat!
Thanks for visiting.
click this link for Interfacing motor with microcontroller using L293D https://www.electroinvention.co.in/l293d-motor-driver-ic-and-interfacing-with-microcontroller
nice basic chaser
Arduino ide, thanks for visiting . Soon I will post more on microcontrollers.